        In this lab you will learn how to use a common macro tool, m4, to create
        custom macro operations to simplify repetitive tasks. You will also learn
        basic stack operations. You will then practice writing and using macros to
        perform system calls and stack based operations.
When you program in any language you will often find yourself repeating a simple or complex sequence of commands over and over again. This is especially true in assembly language programming. If you have ever looked through your code, copied and pasted a segment, then changed only variable (or register) names you might want to consider making a macro.
Macros are similar to functions - they can hide an operation behind a simple descriptive name. However, macros are not functions. A macro call is replaced by text - every time you call the macro your program gets a little longer. A function call always jumps to the same piece of code – the only extra code you will need is the few lines it takes to set up the parameters (and save register states – we'll talk about that next lab).
Here's an example of a code fragment you might want to make into a macro:
	la $a0, MyString	#Get the address of a string
	li $v0, 4 		#Call code to print a string
	syscall 		#Print the string
This is one of those things you will type over and over again in an interactive program. It's not that hard to remember, but the following is even easier:
	#Print String From Label Macro
 	printStrLab(MyString)
You'll never forget the syscall or use the wrong call code.
Your textbook may suggest that SPIM supports user defined macros. However, SPIM has no built-in macro support. You can use m4 instead. The m4 macro language is a common unix tool. Examples of its use include:
"If macros and conditional assembly are useful, why do assemblers for unix systems rarely, if ever, provide them? One ... reason is that other tools on unix—such as cpp, the C preprocessor, or m4, a general macro processor—can provide macros and conditional assembly language programs."
m4 is available to you from the command line on the PCs in CL134.5 or on
Hercules. It can be used interactively if you type m4 and then press enter.
You can learn a lot about its behaviour in this mode, but it is not practical
for real use. To exit interactive mode hit
To use m4 macros in a program you can simply write m4 commands directly into the file you want to use macros in. Usually you will keep macro definitions in macro libraries and include them in your program as needed.
Download this file and save it to c:\workarea: printLib.m4
The contents of this file are not very important right now. All you need to know is that it defines 4 string printing macros:
| Macro | Description |
| printStrLab | Prints a string using a label to get the address.
eg: printStrLab(str1) |
| printStrReg | Prints a string from an address stored in a register -
may be used to print a portion of a string. eg: printStrReg($t1) |
| printStrLit | Prints a literal string. eg: printStrLit("I will be printed to the console\n") |
| printStr |
This is a wrapper macro that tries to guess what type of argument is being
passed. If the first character is a " it uses printStrLit, if the first character is a $ it uses printStrReg, otherwise it uses printStrLab. eg: printStr(str1) printStr($t1) printStr("I will be printed to the console\n") |
There are also some utility macros in there, but you can ignore them for now.
Here is a sample program that uses all of those macros. Copy and paste it into notepad and save it as printDemo.m4.
##
## Program name: printDemo.m4
##
## This program demonstrates how to include and use m4 macros
##
## Several strings are printed to the console
##

include(printLib.m4)		#include a needed macro library

	.text
	.globl __start
__start:
				#this string will be labeled str1
	printStrLit("I'm a literal string.\n")
				#the next will be labeled str2
	printStr("I am too.\n\n\n")

	printStrLab(myStr)
	printStr(str2)

	printStr("Registers can be  used to point to different parts of strings\n")
	la $t1, myStr
	addi $t1, $t1, 13	#Point somewhere else in the string
	printStrReg($t1)
	addi $t1, 11 		#Point a little farther in the same string
	printStr($t1)

	li $v0, 10
	syscall

	.data
myStr: .asciiz "I'm a string defined in the data section\n"
To turn this file into a MIPS assembly program pass it through the m4 macro
processor. m4 is a command line tool so you'll need to open a command shell.
Click Start>run... type cmd then click OK. In the window
that appears type:
c:
cd \workarea
m4 printDemo.m4 > printDemo.s
Take a look at printDemo.s. The expansion is considerably longer – 71 lines vs. 32 lines.
You can run printDemo.s from the command line by typing:
pcspim printDemo.sYour output should look like this:
I'm a literal string.
I am too.


I'm a string defined in the data section
I am too.


These two strings were printed from registers.
defined in the data section
the data section
m4 has two kinds of macros: builtin and composite. For simplicity we will call builtins "commands" and composites "macros". A macro is defined with the define command. define takes two arguments, the first is the new macro's name and the second is its output. This is a basic macro:
define(`MyMacro',`Hello I am your macro!')
MyMacro #calls the MyMacro macro you defined
The ` mark (located at the upper left of your keyboard) and the ' mark (located next to the Enter key) indicate quoted text. It is usually a good idea to quote the arguments to an m4 macro, but it is not always necessary. Consult the documentation to learn more. To test it out create a new text file called firstmac.m4, copy the code above into it—for this example be careful not to leave a blank line at the end. Save the file and exit. Run m4 by typing:
m4 firstmac.m4
You should get this output:
Hello I am your macro! #calls the MyMacro macro you defined
In this format macros are perfect for creating mnemonics for values you use in your program. You could, for example, define PI and us it where needed.
The # mark in the program indicates the beginning of a comment. Any macros found after the comment symbol on a line are not expanded. Hence MyMacro is left in the comment part of the output but expanded to "Hello I am your macro!" at the beginning of the line.
Beware of unwanted macro expansion. The # mark is one tool you can use. An empty quote, `', in the middle of a macro name can be used to prevent it from being expanded, or it can be used to separate two macros without adding a blank space to the output.
Putting quotes around a macro can delay its expansion. This is useful when passing a macro as an argument to a macro or command.
It is important to be aware of what commands and macros are already defined. Some will expand without any arguments and produce unwanted results. Click here for a list of commands to watch out for.
Notice that there is an extra blank line in the output from the last example. Any text that is not inside an m4 command is printed, including blank spaces and new lines. To prevent or control output you can use these commands:
| Command | Effect |
| dnl | Suppress the rest of the line up to and including the newline character. |
| divert(-1) | Send all output after this command to nowhere. |
| divert(0) | Send all output after this command to stdout |
An m4 library usually uses these commands together to prevent extra white space from appearing in the output.
Leading whitespace sent as an argument to a macro or command is ignored unless it is inside quotes. Trailing whitespace is always sent. Notice the difference between these two examples:
divert(-1)
define(`Hi',    `tight quotes'   )
define(`HiQ',`   loose quotes')
divert(0)dnl
Hi with tight quotes
HiQ with loose quotes
H`'iQ won't expand dnl and I won't print
which becomes:
tight quotes    with tight quotes
   loose quotes with loose quotes
HiQ won't expand
Now you need to know how to send arguments to your macros. All macros can receive any number of arguments. They are not declared when the macro is defined. Instead they are used when they are asked for in the macro body. The arguments are labelled $0, $1, ... $n. To see an example look at the printStrLab macro in stringLib.m4. It looks like this:
define(printStrLab,
       `#Print the string from label $1
        li $v0, 4
        la $a0, $1
        syscall
')
A simple macro can act as a variable. This:
define(`a', 1)dnl
a
define(`a', 5)dnl
a
produces this output:
1
5
The eval command can do integer math. Consult the documentation for details. Eg. this:
define(`a', 5)dnl
define(`b', `eval((a + 3) * 4)')dnl
b
produces this output
32
The ifelse command works a bit like an if{} else{} construct in C. The command's syntax is:
ifelse(some variable or expression,
       condition to match - could be true (1) or false (0),
       true branch,
false branch)
As an example:
divert(-1)
define(`test',
  `ifelse(eval(a < 5),
         `1',
         `a is less than 5',
         `a is greater than or equal to 5')')
divert(0)dnl
define(`a',`1')dnl
test
define(`a',eval(a + 5))dnl
test
produces this output:
1 is less than 5
6 is greater than or equal to 5
Warning: this particular example is VERY sensitive to quoting. It took a few tries to get it just right.
The equivalents to the standard loops are not very useful for general macro writing. Instead you will learn the foreach loop. The foreach loop performs the same operation on each item in a list of items. You will see a practical use for it later in this lab. To use it you will need this file: foreach.m4
This is how it could be used:include(`foreach.m4')dnl divert(-1) define(`SayHello', `foreach(`x', `($1)', `Hello x! ')' ) divert(0)dnl SayHello(`Alice, Mary, Sue, John, Ivy, James, Roger')dnlwhich produces this output:
Hello Alice!
Hello Mary!
Hello Sue!
Hello John!
Hello Ivy!
Hello James!
Hello Roger!
The first argument to foreach is used as a variable, the second is a list, and the third is the output text. For every iteration a member of the list will replace the variable symbol in the output text.
Memory allocated to your program is divided into three segments text, data, and stack. The text and data segments are located near the beginning of your program's memory and grow up in memory address. The stack segment begins in the middle of your memory space and grows back toward the data segment.
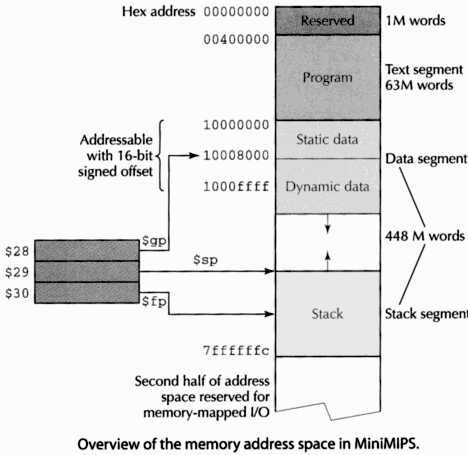
The three pointers on the left all have special purposes when referring to memory.
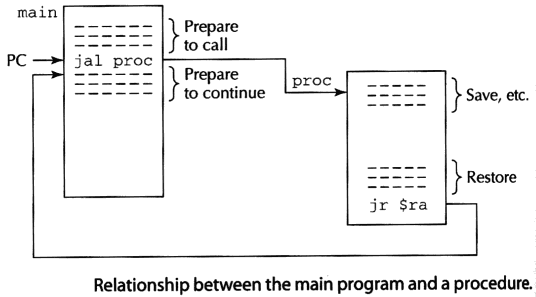
The stack is used to temporarily store information. It is most often used for function calls. The contents of registers a calling program wants to preserve are stored on the stack prior to calling and restored afterwards. Registers that the called function needs to use but has agreed to preserve are saved by that function. When all the work is done, the function restores saved registers to their original states. Then the calling program restores the registers it saved and processing continues.
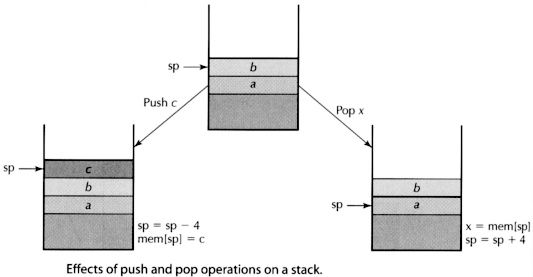
The hardware stack is similar to the stack ADT. It grows only at one end. We usually interact with it using push and pop operations. A push stores one word, and a pop removes one word.
Some hardware has built-in push and pop operations. MIPS does not have them. Instead we directly manipulate the stack pointer and access the memory next to it.
To push and pop $s1 you would use this code:
	#push
	addi	$sp, $sp, -4 	#increment the stack pointer by one word
	sw	$s1, 0($sp)	#store information in new space on the stack

	#Do some stuff

	#pop
	lw	$s1, 0($sp)	#load information off the stack
	addi	$sp, $sp, 4	#shrink the stack
These operations produce an effect like this:
If your program is the only one that will be running you could reverse the order of the lw and addi instructions. If your program will be running on a modern OS it could be interrupted between the two instructions. Then the topmost datum could be overwritten before it is popped. This really happens and is hard to diagnose in large programs.
Unlike a normal stack ADT the hardware stack supports random access; you can read or write any item in the stack. This can be used to your advantage. Simply make a hole in the stack, remember where it is, and you've got temporary memory to play with. This is used for storing parameters to functions and setting up local variables (more on this next lab). It can also be used to optimize stack operations.
Suppose you need to store 5 registers. You can use normal push and pop operations. Or you can make a hole in the stack big enough for the 5 registers and then use the stack pointer to do immediate memory access to store stuff in the stack. Eg.:
#push 5 registers addi $sp, $sp, -4 sw $s1, 0($sp) addi $sp, $sp, -4 sw $s2, 0($sp) addi $sp, $sp, -4 sw $s3, 0($sp) addi $sp, $sp, -4 sw $s4, 0($sp) addi $sp, $sp, -4 sw $s5, 0($sp) #pop 5 registers lw $s5, 0($sp) addi $sp, $sp, 4 lw $s4, 0($sp) addi $sp, $sp, 4 lw $s3, 0($sp) addi $sp, $sp, 4 lw $s2, 0($sp) addi $sp, $sp, 4 lw $s1, 0($sp) addi $sp, $sp, 4 |
vs. |
#push 5 registers at once addi $sp, $sp, -20 sw $s1, 16(sp) sw $s2, 12(sp) sw $s3, 8(sp) sw $s4, 4(sp) sw $s5, 0(sp) #pop 5 registers at once lw $s5, 0($sp) lw $s4, 4($sp) lw $s3, 8($sp) lw $s2, 12($sp) lw $s1, 16($sp) addi $sp, $sp, 20 |
That made the push/pop set run in 12 clocks instead of 20. Not bad.
The push and pop stack operations are ideal candidates for macros. The instructions used to implement them are prone to error and they are used frequently. The foreach macro could be used to push multiple registers at once. You would need to invoke it twice: once to count the registers sent as an argument, and again to store or load them.
Remember:Things pop off the stack in the reverse order that you push them on.

|
|
|
| |
|
|