TextEdit provides the equivalent of the Windows Notepad editor. TextEdit is found on all releases of the Mac operating system. Another option is TextWrangler which is my personal preference because of its builtin FTP capability. I'll get to it shortly (see below).
After using TextEdit to create or update files, Fugu will handle the upload process to transfer the files to one's account on Hercules or Hyperion. Fugu is provided by Information services in the Download area where WinSCP and other applications are found.
I only mention Hyperion because this is the system associated with your University of Regina account. You might want to use it to retain a copy of any files you create on Hercules. That isn't necessary but the more backup copies you have, the less likely you are to be very unhappy at the loss of a file.
Cautionary note: You may encounter an issue regarding the name of the machine called Hyperion. The actual hardware was upgraded recently and there was a period of transition as user files were moved to the new hardware. Currently the address uregina.ca works as does the address hyperion2.cc.uregina.ca. The address hyperion.cc.uregina.ca currently does not work but Information Services plans to restore use of the name Hyperion at some point.
I was not going to mention an equivalent to the Paint program in Windows, but then you might want something depending on what you plan to do for capturing images from the screen. I recommend that you download and install Paintbrush. It is easy to use and it is free. In particular, it can convert file formats by opening, for example, a PNG file, and then saving the file in whatever graphic file format you need.
Screen capture tools are a very personal choice. They must be since there are so many options. TinyGrab is available for free from the Apple App Store (not the iTunes store). It saves screen snapshots in PNG format which you can then convert to whatever you need with Paintbrush. I've downloaded Skitch. It is also free, and able to do screen snapshots and manipulate images. However, users are split in their comments from love to hate and I have only tried it a couple of times so no opinion yet.
I also use a utility from Apple called Grab. I think it is has been made redundant by other options but it works fine other than saving the captured image in tiff format (which I then usually convert to something else using Paintbrush).
Have a look at this description of TextWrangler. This is a free text editor from Bare Bones Software. It has become my favourite editor because of the coloured highlighting of language elements and its builtin FTP ability. Even so, I usually have Fugu running simultaneously. Fugu lets me quickly change file permissions and occasionally I need to see a list of all of the files in the remote directory.
NOTE: The GNU compiler is part of the Xcode IDE (see my comments below) but it can be downloaded separately. Depending on the
version you need to match the version of Mac OS that you are using, it is about a 200MB download. You do need to register
your Apple ID as a developer. I don't understand why Apple requires this but then Microsoft insists on an MS account if you want
to keep using Visual Studio. It is free and takes just moments.
Before you download the software, go into the terminal application and try the compiler commands that you'll find
just below. Depending on the age of your machine and the version of Mac OS you have, you might already have the compiler installed.
The same applies to Xcode. Apple used to distribute the GNU compiler and Xcode with Mac OS. Older versions of the compiler or Xcode will
work just fine for CS110.
If you don't have it, go to developer.apple.com/downloads to register and get the software.

You will need to scroll down to find the Command Line Tools. Choose the version to match the version of Mac OS that you are using.


The Mac OS contains the Bash shell. The following examples assume that you placed your C++ programs in a directory and then positioned yourself within that directory prior to compiling. After starting the Terminal app, use "pwd" and "cd" to locate where you are and position yourself wherever you keep your C++ files. Use "ls" to see a listing of the files in your current directory and use "cat" to display the contents of a file, for example, "cat Welcome.cpp" displays the contents of Welcome.cpp. Use TextEdit or TextWrangler to actually edit the files.
g++ Welcome.cpp -o Welcome
will compile Welcome.cpp and put the executable result in Welcome.
./Welcome
runs the actual file. The requirement for "./" in front of the filename is a feature of Bash. It says to look in the
current directory for the file. Given that you are positioned in that directory and that the compiler found your
C++ file without needing the "./" this is just plain annoying.
You can compile multiple files by just providing a list of filenames:
g++ file1.cpp file2.cpp file3.cpp -o myprogram
./myprogram
Alternatively, you can compile them separately using the "-c" option and then link them to get the runnable result.
g++ -c file1.cpp
g++ -c file2.cpp
g++ -c file3.cpp
g++ file1.o file2.o file3.o -o myprogram
./myprogram
Search for information on the GNU project if you want to know more about the enthusiasts who work on projects to make free software.

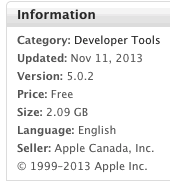
Xcode is available from the Apple App Store. Just like Microsoft's Visual Studio, it is a highly regarded IDE. But, like VS, it is big in terms of both the download size as well as the various capabilities it provides. The time required to become comfortable with an IDE needs to be weighed against what you gain from working in a relatively complex environment. The directions that follow provide a minimalist view of using Xcode that might lead you to decide Xcode is the way you want to go.
A Google search for "Xcode tutorial C++" returns numerous explanations and examples of installing Xcode and getting started.
Before starting Xcode, create a folder into which you place the file containing your C++ file. For example,
in setting up to compile the Welcome.cpp example from the text, I placed Welcome.cpp in a folder named
"Welcome" as you'll see shortly.
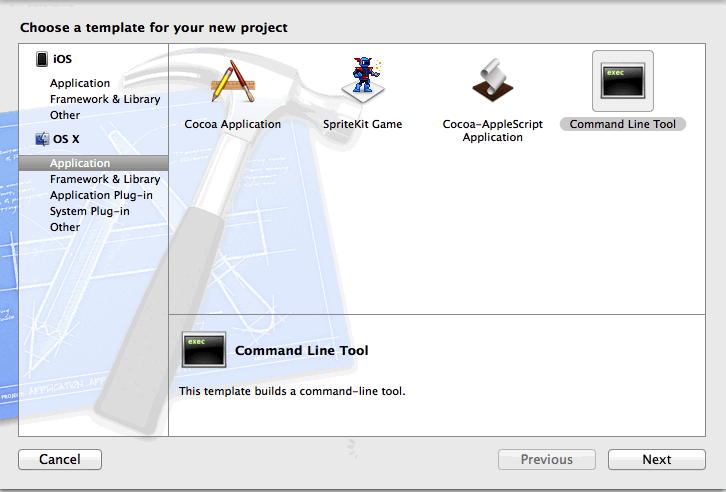
After starting Xcode, indicate that you are building an OS X Application of the Command Line Tool variety.
The image below shows the choices you make:
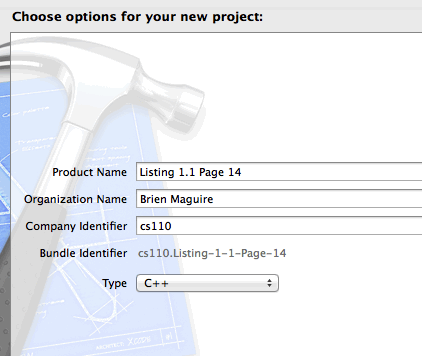
You need to provide a project name. Choose something like this example where I've indicated
that I am working on the first example in the text. You have to fill out the other fields also so
why not your name and the class as shown here:
You will be asked for a location where you want to build the project. The issue here is remembering
where you put your programs and projects. I used the folder in which I had placed the original Welcome.cpp
file and the result is that I keep the program file and the project file somewhere that
I can easily find them as you see in the next image. Notice that my folder, "Welcome" now contains the "Welcome.cpp"
source file and the project which I called "Listing 1.1 page 14."
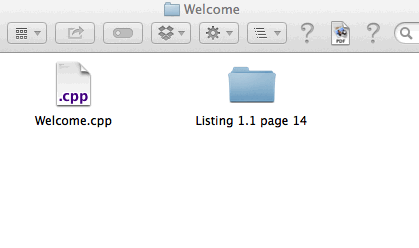
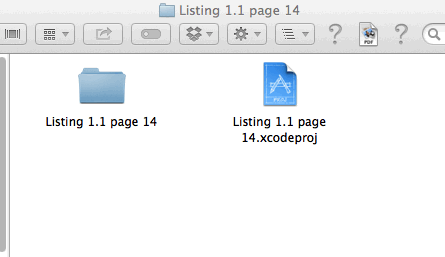
After you have actually "Run" the program, causing it to be compiled, linked and run, you'll
find the project file, "Listing 1.1 page 14.xcodeproj" inside the project folder as seen here:
Missing from this explanation are several steps that resulted in what you see next. The tutorials
you find in your search will explain the various panels Xcode displays. The top right corner
of the Xcode window alllows you to choose those of interest. As you see in this image, I kept
it only a few open. Notice that the target (see the leftmost panel) contains Welcome.cpp. I used
"File/Add Files" to add Welcome.cpp. I deleted the initial cpp files that Xcode generated for the new project.
In particular, Xcode starts off
by settings you up with a main.cpp that you can edit within Xcode to build your program. When you already
have a program file, add it and delete the main.cpp provided by Xcode or, alternatively, copy/paste what you need
from your existing file into main.cpp. You'll find the "Run" command in the
Product menu.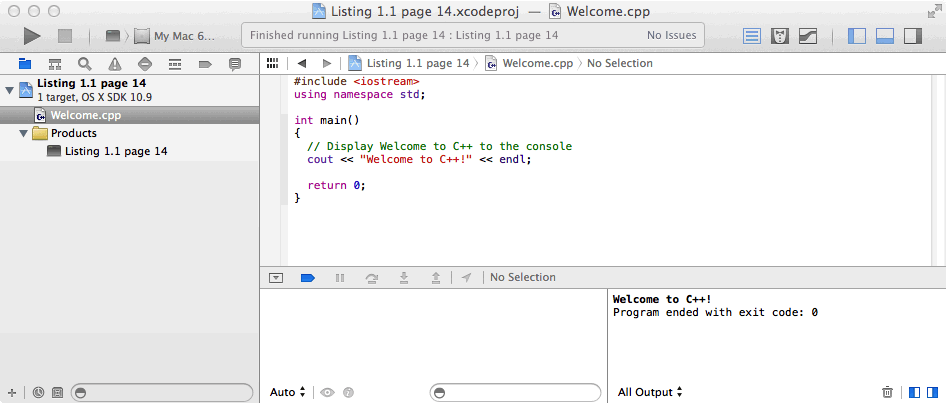
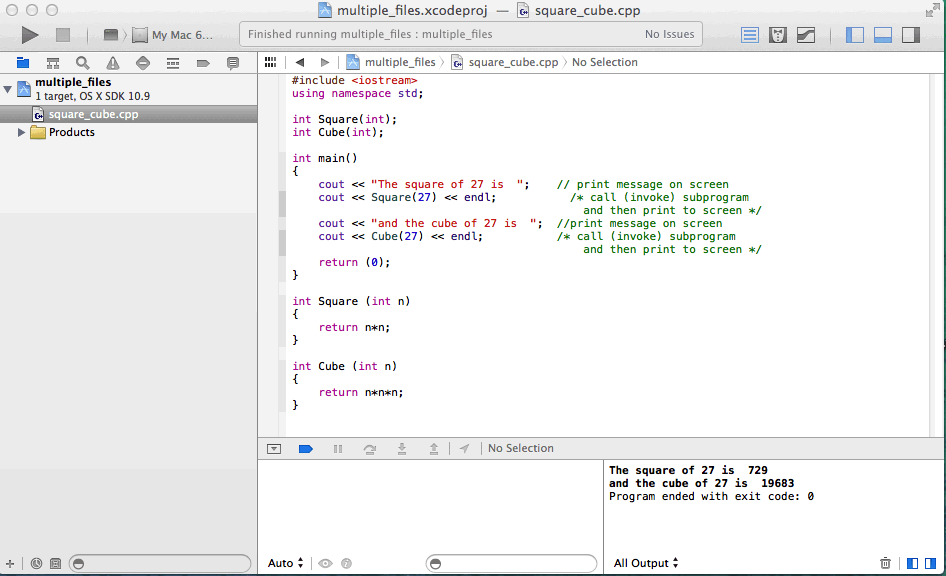
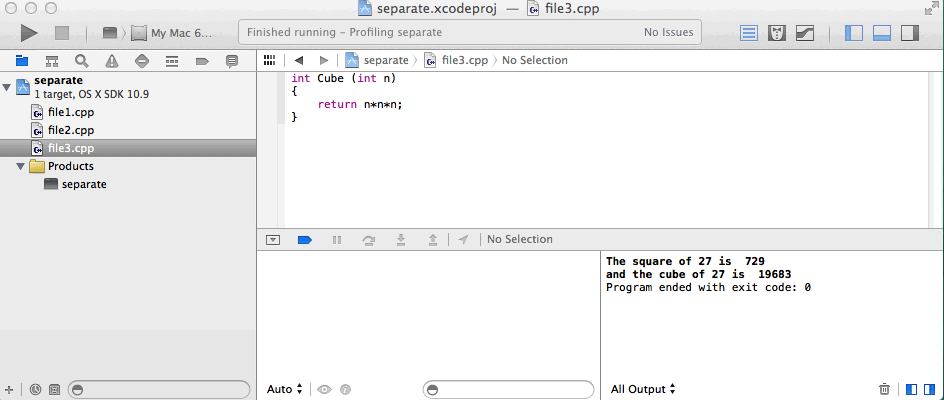
Jumping ahead a bit, here are the results with an example with a pair of functions. Function are way
off in Chapter 6 but you can't miss what is happening here. In the first image, the functions were
placed in the same file as the main program. In the second image, the main program and the functions were kept as
separate files, added one-by-one and then Run. Look in the left panel to see the three files are present.
Xcode simply compiled and linked all three files when told to Run. And that is an indication
of when an IDE starts to make things easier to do than using multiple commands in a Command Line interface.
I will mention Alfred, an application available from the Apple App Store for free. It is useful for searching for files and file contents on your computer, but it is especially useful for being able to type option/space and the first letter or two of an application to find and run the application. Highly recommended.
